Argos DataBlock Connector - Tableau Configuration
Tableau® retrieves data sources via HTTP or HTTPS. The Argos DataBlock Connector by Evisions (or Web Data Connector for older versions of Tableau), is the Argos DataBlock Connector for Tableau environments.
Note: The MAPS version 6.12 release included support for Tableau version 2024.1 and higher. The following instructions pertain to both newer versions of Tableau (version 2024.1 and higher) as well as older versions (versions used prior to the MAPS 6.12 release). It is recommended to update to the newest version of Tableau.
For those using the Web Data Connector, a script provided by Evisions can be tested in several ways:
- Tableau
- Tableau Public (free edition)
- Tableau Web Data Connector Simulator
The Web Data Connector Simulator is an application provided by Tableau that emulates a Tableau environment specifically for purposes of testing Web Data Connectors. It can be used to test if access to a full Tableau environment is not available. You can also download and install the free edition of Tableau, called Tableau Public. This document explains how to set up the simulator and test the Evisions ArgosWDC script, followed by how to run the script in Tableau Public. The configuration should be similar when using the licensed version of Tableau.
Deprecated Versions
Note: As of Argos version 6.12 the Argos DataBlock Connector requires Tableau Desktop 2024.1 or higher in order to operate. The Argos DataBlock Connector is deployed as a .taco file. In order to run the connector, the following in required:
Launch Tableau Desktop and search for Argos DataBlock Connector by Evisions.
Install Script Files
If not already installed, refer to the previous section for instructions on obtaining the script files and placing them on the MAPS server.
The Tableau script files are installed in the ..\http_files\adbc\Tableau folder of the MAPS Service directory. If you intend to to customize the script or write a new one, we recommend placing your modified files in ..\http_files\adbc\Tableau\Custom to ensure that your changes are not overwritten accidentally in the future. Files in a Custom folder will automatically be used in place of files of the same name one directory up.
Create Optional Config File
The Tableau script includes a template for a global config file, called ArgosWDC-config.template.js. If desired, you can name a copy of this file ArgosWDC-config.js, and use it to specify certain optional global configuration settings. Available settings include the base URL to MAPS, the name of the session cookie used by the DataBlock Connector, a maximum number of records to be returned, and a default DataBlock and inputs. You can find detailed configuration instructions in the comments section of the ArgosWDC-config.template.js file.
Note: In testing the script file, we have found that the Tableau simulator may perform poorly or crash when selecting extremely large amounts of data. You can use the optional maxRecordCount setting to limit the number of results returned if this becomes an issue for you.
Copying the File to Your Tableau Directory
The .taco file for installing the Tableau connector can be found under the Argos DataBlock Connector Script Files article, on the Evisions support site.
Copy the .taco file into your My Tableau Repository/Connectors directory. For instructions on which directory the .taco file should be copied into, refer to the Tableu Connector documentation.
Launch Tableau Desktop and search for Argos DataBlock Connector by Evisions.
Signing In and Setting Up
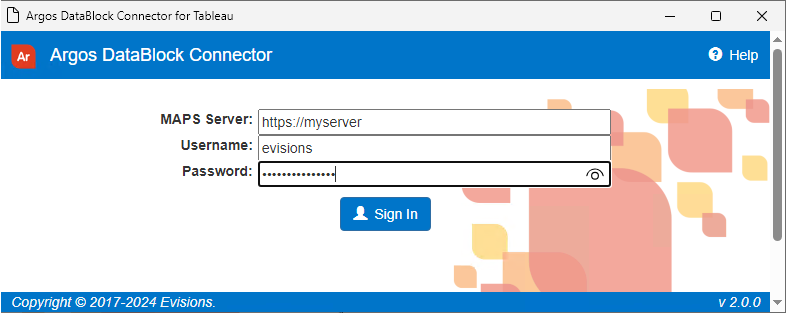
In the MAPS Server field, enter the URL of your MAPS server. This URL must include https:// at the beginning of the path. If https has not been setup for your MAPS server, please have your MAPS Administrator configure it using a valid certificate signed and recognized by a trusted Certificate Authority (CA).
Then, sign in as a user who has appropriate permissions to access Argos, the DataBlock you wish to run, and any necessary data connections.

On the next screen, enter the path to the DataBlock that you want to access. The path uses the Argos path format where folders are separated by a period. In the example below, the DataBlock called "Name Distribution" is located in a folder called "My Folder". In the Argos client, you can find the path of any object by right-clicking on it and selecting Copy Path to Clipboard. The Max record count is the maximum number of records to be retrieved by the query.
Select Read Inputs to load a list of the parameters expected by this DataBlock's report query.
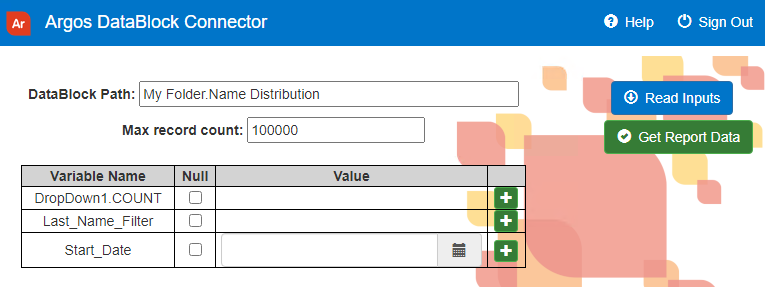
Enter the value for each variable in the Value field next to its name. If you want to specify more than one value for a variable, click the green ![]() button next to the variable name to add an additional entry field. Use the red
button next to the variable name to add an additional entry field. Use the red ![]() button to remove a value that is no longer needed.
button to remove a value that is no longer needed.
If the SQL in the report query supports it,(i.e., you know that the query is using the parameter in a LIKE statement), you can use a percent sign (%) as a wildcard character. For example, entering "Ab%" for a name field could return names such as "Abby", "Aberforth", etc.
To enter a null value, check the box in the Null column instead of entering a value.
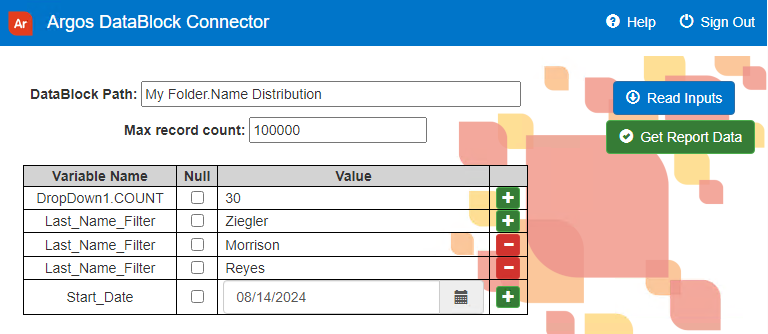
When finished, select Get Report Data to execute the report query and bring the data into Tableau.
After clicking Get Report Data, the dialog will close and you will see the new connection added in Tableau.
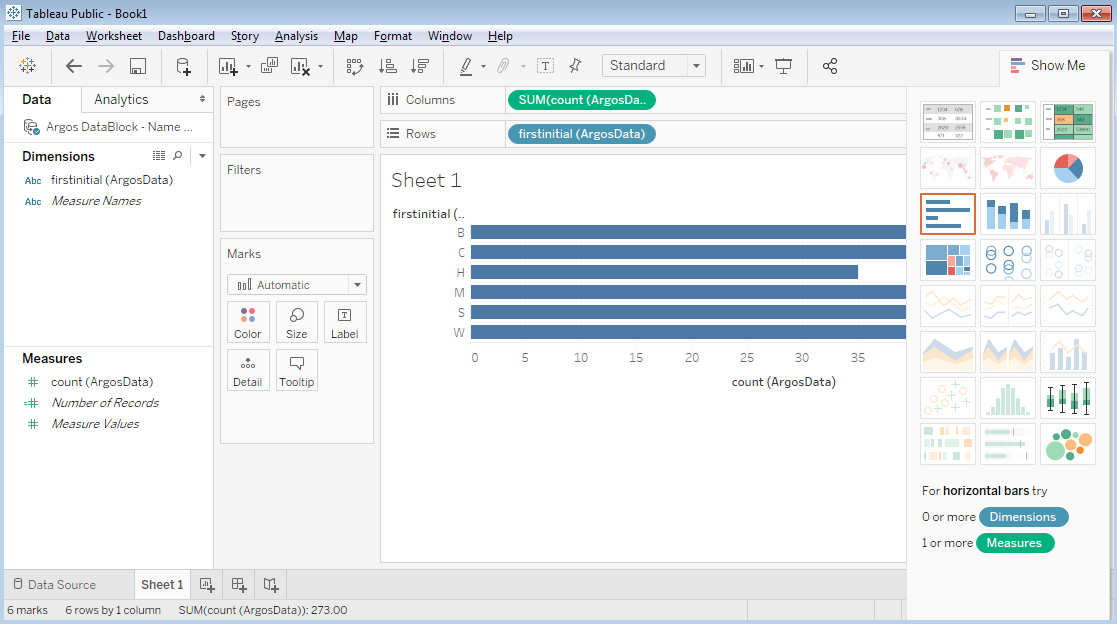
You can now manipulate the data for this connector as you would with any other in Tableau. To get started, click on Sheet1 at the bottom of the screen to open a blank worksheet. You can then add visualizations and manipulate the dimensions and measures available through the connector.
For more information on how to use Tableau Public, please refer to the Tableau Help.
Troubleshooting
You can press F12 at any time to open your browser's development tools dialog for help troubleshooting errors.
Web Data Connector Simulator Configuration
Before beginning, you should review the Tableau Web Data Connector page for an overview of the tool.
Follow the instructions in the Get Started section of their documentation to:
- Install Git
- Install Node.js
- Get the WDC SDK by cloning the repository
- Install npm
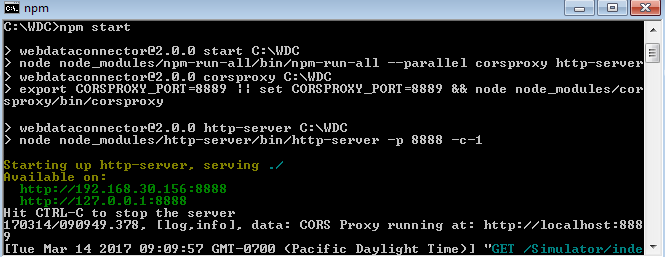
Once this is configured, to start the simulator, first open a command prompt and navigate to the directory where you downloaded the repository. Then, type npm start to start the test web server.
Connecting to a DataBlock in the Simulator
In a browser, navigate to http://localhost:8888/Simulator/index.html to load the simulator page.
In the Connector URL field, enter the address of your MAPS server followed by the path to the ArgosWDC.html file within the http_files folder in your MAPS Service directory. The path should look like /adbc/Tableau/ArgosWDC.html.
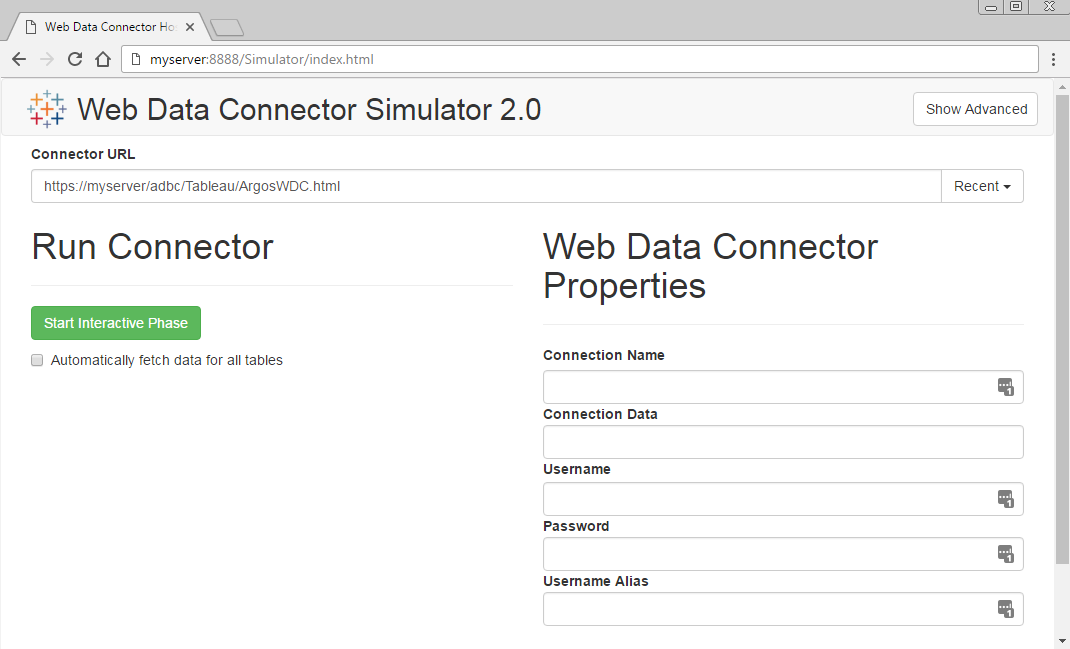
Click the Start Interactive Phase button to launch the Argos DataBlock Connector simulator:
On the next screen, enter the path to the DataBlock that you want to access. The path uses the Argos path format where folders are separated by a period. In the example below, the DataBlock called "Name Distribution" is located in a folder called "My Folder". In the Argos client, you can find the path of any object by right-clicking on it and selecting Copy Path to Clipboard.
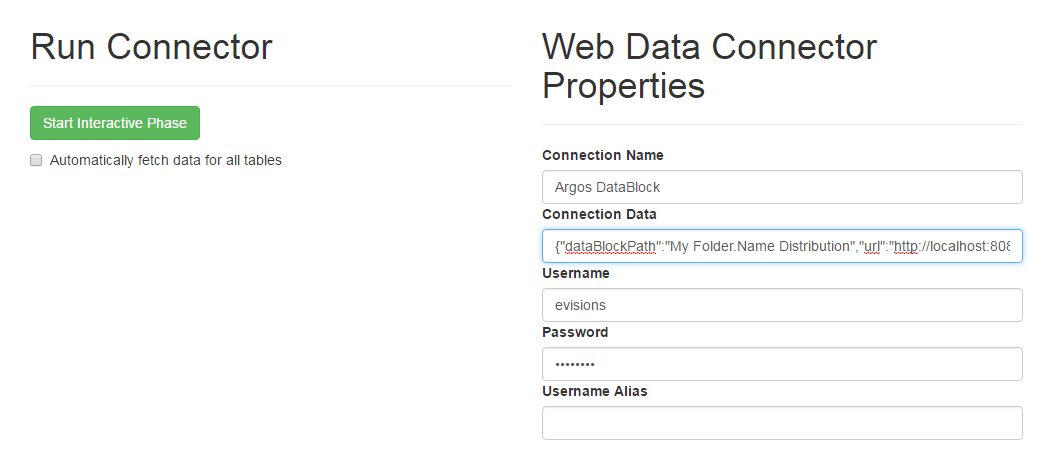
The Connection Data field contains the JSON information required by the Argos DataBlock Connector API, which includes the MAPS server information, the location of the DataBlock, and all of the specified parameters and their values. In the example above, this takes the form:
{"dataBlockPath":"My Folder.Name Distribution","url":"http://localhost:8080/","inputs":[{"name":"DropDown1.Count","dataType":"String","value":"30"},{"name":"Last_Name_Filter","dataType":"String","value":["Ziegler","Morrison","Reyes"]},{"name":"Start_Date","dataType":"Date","value":"2017-03-16"}]}
Below the Web Data Connector Properties, the Tables section lists the table fields that will be returned by the query.
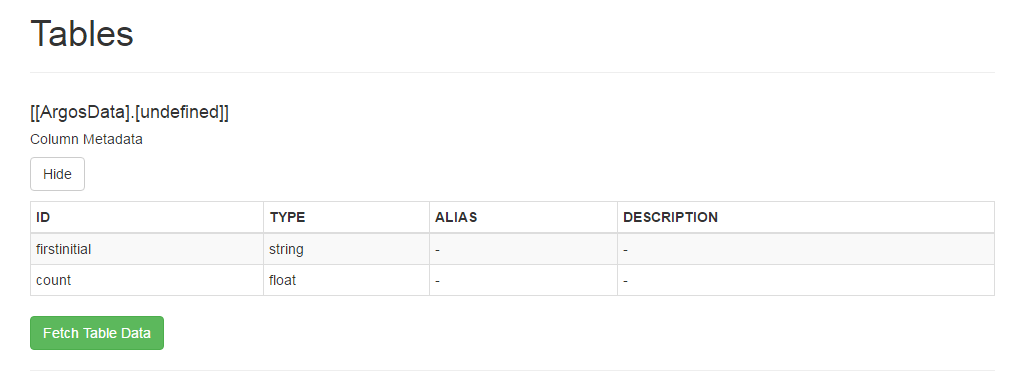
Select Fetch Table Data to pull in the query results and verify that you are seeing the expected data.
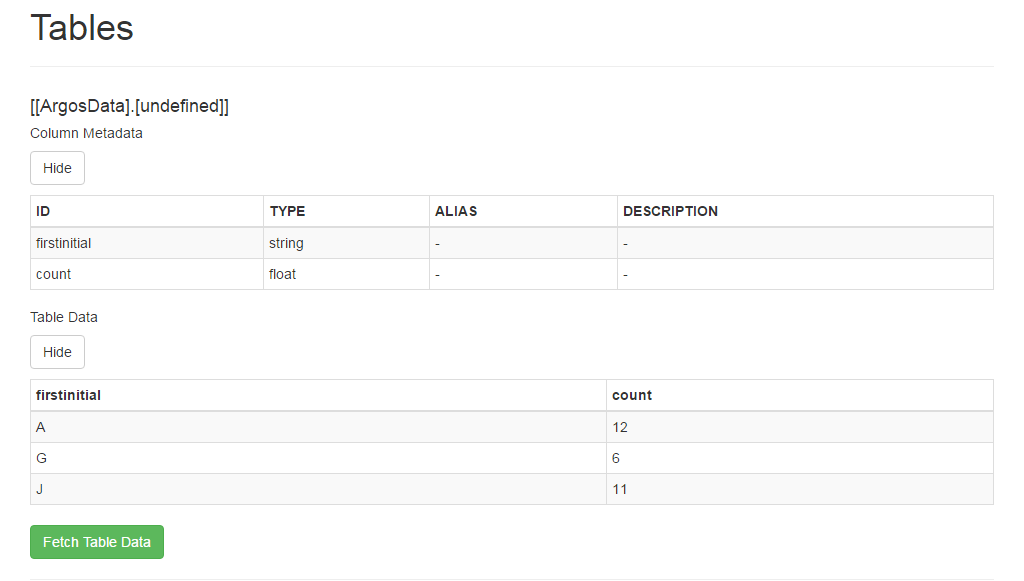
Tableau Public Configuration
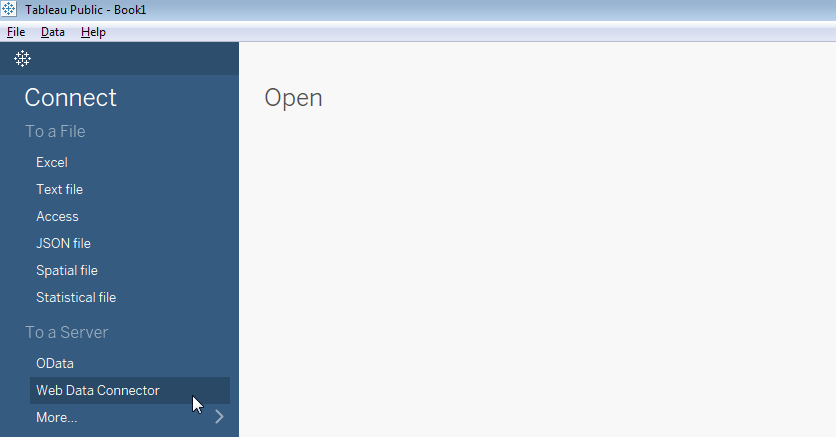
After installing Tableau Public, launch the application and select Connect -> To a Server -> Web Data Connector in the menu on the left.
Enter the URL to your MAPS server, followed by the path to the ArgosWDC.html file from the http_files directory of the MAPS Service folder. For example, http://myserver/adbc/Tableau/ArgosWDC.html.
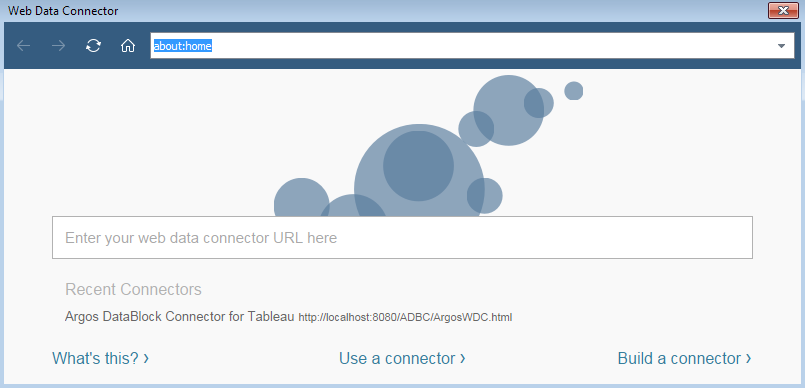
Press Enter after typing in the URL. You will see the login screen for the Argos DataBlock Connector.
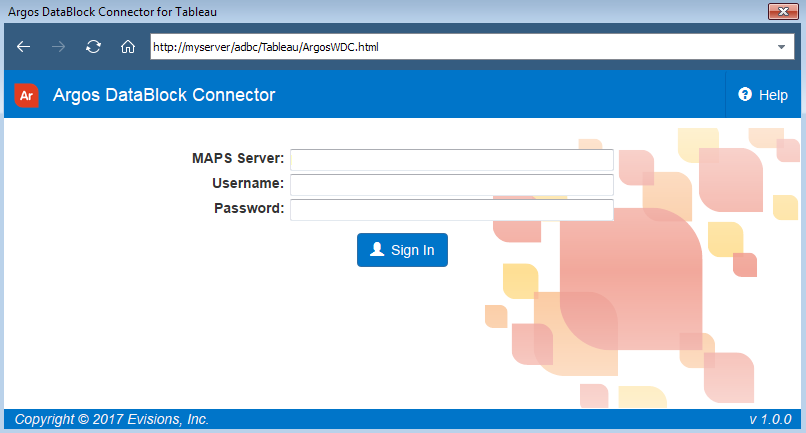
Follow the instructions in the previous section for signing in, retrieving the list of parameters, and entering parameter values.
After clicking Get Report Data, the dialog will close and you will see the new Web Data Connector added in Tableau.
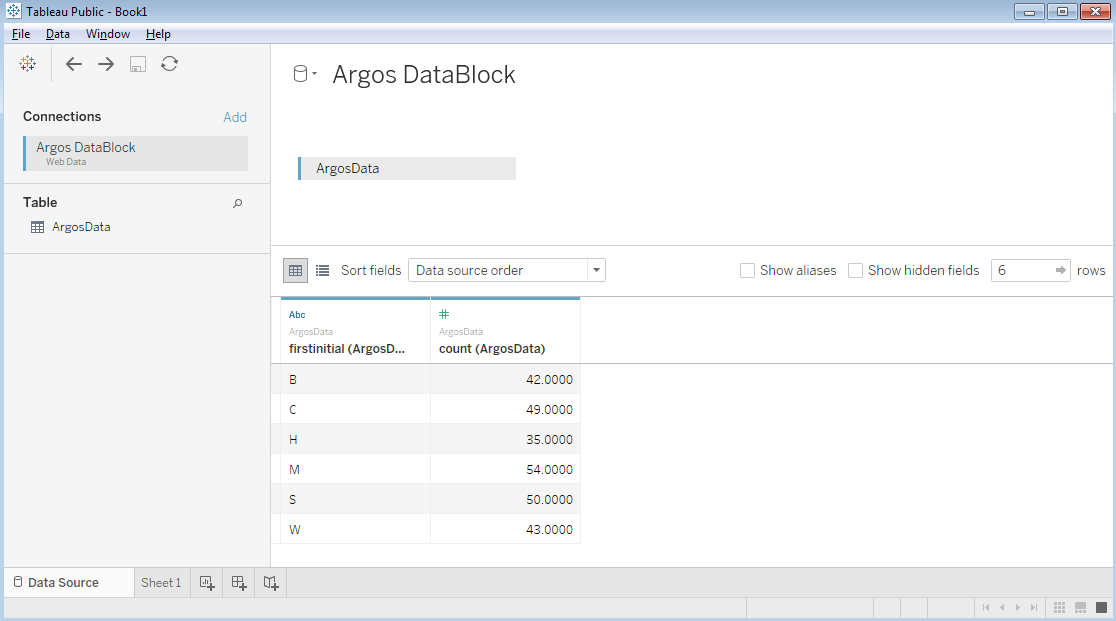
You can now manipulate the data for this connector as you would with any other in Tableau. To get started, click on Sheet1 at the bottom of the screen to open a blank worksheet. You can then add visualizations and manipulate the dimensions and measures available through the connector.
For more information on how to use Tableau Public, please refer to the Tableau Help.